
I'm gonna be posting a series of articles on new features and cool technology bits that are landing in Ubuntu Oneiric (11.10) server. Why? I like servers, I like cloud, I like Ubuntu, it all mixes well, what's not to like :)
During this first article, I'll be demoing (in a graphically intensive way :) what it takes (hint: not much!) to deploy a server fleet with Oneiric server. Orchestra is the name of a wonderful piece of technology that lands in Oneiric, that's been created on top of the open-source cobbler project. Orchestra is super easy to install and get started with, and enables you to very rapidly deploy tens or hundreds of physical servers. I'll be using virtualbox to build a small test "lab" on my laptop for purposes of this article. I did actually try KVM first, but faced some trouble getting PXE booting reliably, so I opted for virtualbox which worked flawlessly (kudos vbox guys, you rock!)
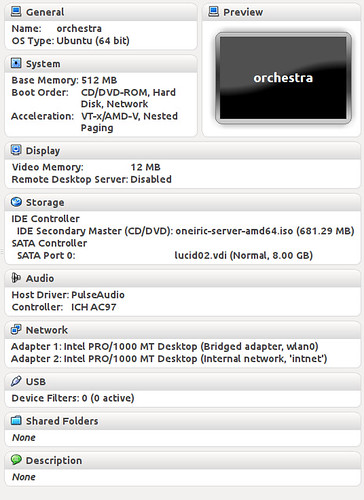
Let's get started, I created a VM to represent the very first "head node", that will install the rest of all nodes. Here is a summary of its configuration
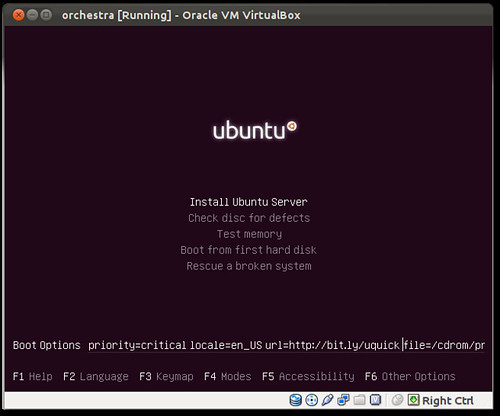
Pop in the virtual CD, boot it, press F6, add "priority=critical locale=en_US url=http://bit.ly/uquick" (Thanks Dustin!) so it looks like
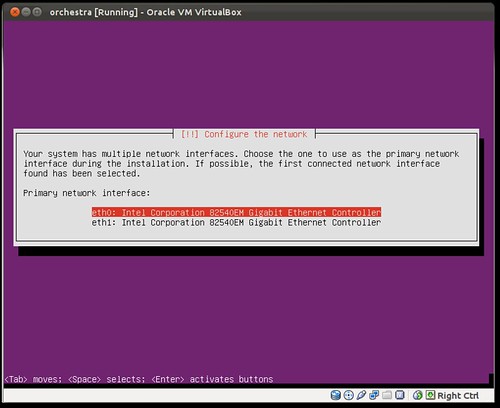
The uquick profile answers all the installer questions, such that the installation is fully automatic. Since the VM contains two NICs however, we'll need to select a primary one (eth0 in my case)
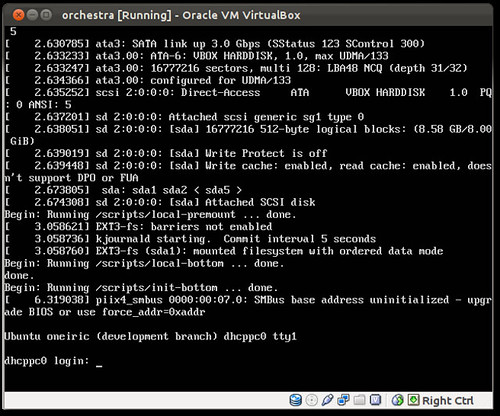
The installation runs like a champ, fully automated, give it a few minutes till it finishes everything and reboots into the server OS (oh that was easy!)
Now I configure eth1 to have a static IP address of 192.168.77.1/24 (I made any address up), here is a snapshot of /etc/network/interfaces and I started eth1 using ifup

At this stage, I rebooted the server but you definitely don't have to. Let's start actually installing Orchestra
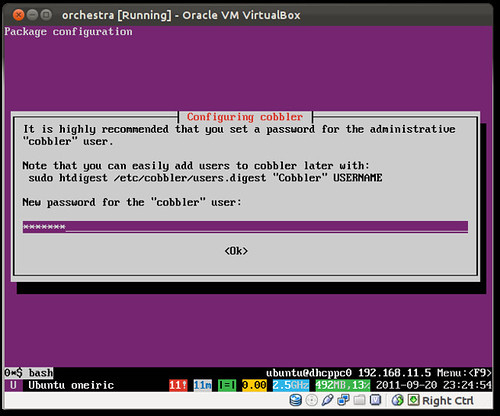
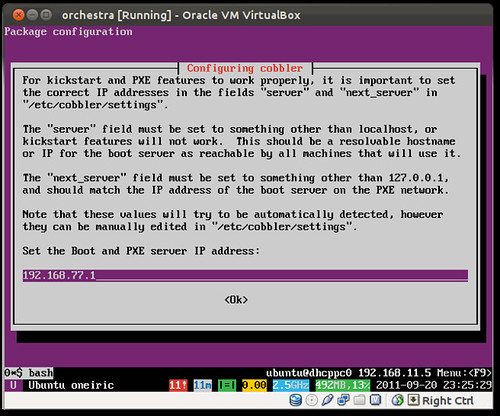
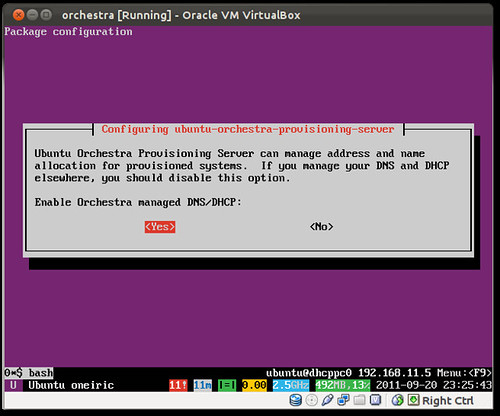
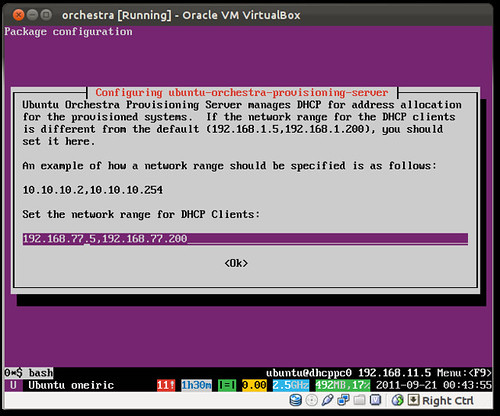
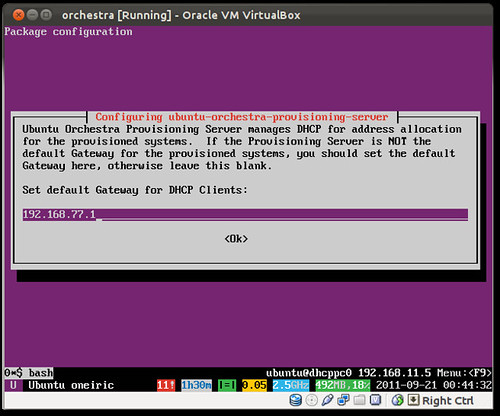
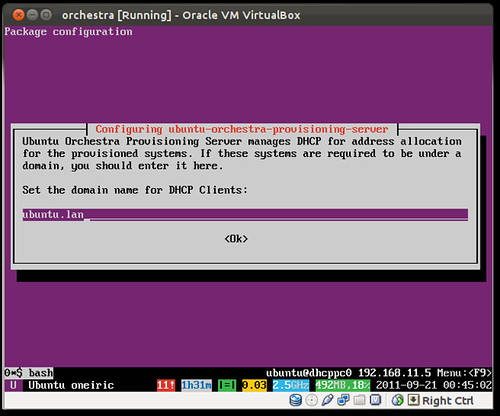
Everything proceeds automatically, for any question you get during package installation, I'll provide a picture with the answer :)
That's it! You've just installed and configured your first Ubuntu Orchestra server, and you're now ready to install a fleet of Ubuntu servers the easy way! In part 2 of this article, I'll go through creating a second server, PXE booting and installing it from the orchestra server. (Extra credit: If you can't wait, try PXE booting a fresh server right now. Note that after installation, orchestra actually downloads and auto-imports a few Ubuntu mini ISOs, thus will need a few minutes depending on your internet connection speed)
So, what do you think of this coolness? Is this easier than the last time you tried building yourself an automated network installer? Shoot me a comment, let me know what you think
During this first article, I'll be demoing (in a graphically intensive way :) what it takes (hint: not much!) to deploy a server fleet with Oneiric server. Orchestra is the name of a wonderful piece of technology that lands in Oneiric, that's been created on top of the open-source cobbler project. Orchestra is super easy to install and get started with, and enables you to very rapidly deploy tens or hundreds of physical servers. I'll be using virtualbox to build a small test "lab" on my laptop for purposes of this article. I did actually try KVM first, but faced some trouble getting PXE booting reliably, so I opted for virtualbox which worked flawlessly (kudos vbox guys, you rock!)
Let's get started, I created a VM to represent the very first "head node", that will install the rest of all nodes. Here is a summary of its configuration
Pop in the virtual CD, boot it, press F6, add "priority=critical locale=en_US url=http://bit.ly/uquick" (Thanks Dustin!) so it looks like
The uquick profile answers all the installer questions, such that the installation is fully automatic. Since the VM contains two NICs however, we'll need to select a primary one (eth0 in my case)
The installation runs like a champ, fully automated, give it a few minutes till it finishes everything and reboots into the server OS (oh that was easy!)
Now I configure eth1 to have a static IP address of 192.168.77.1/24 (I made any address up), here is a snapshot of /etc/network/interfaces and I started eth1 using ifup
At this stage, I rebooted the server but you definitely don't have to. Let's start actually installing Orchestra
sudo apt-get update
sudo apt-get install ubuntu-orchestra-server -y
Everything proceeds automatically, for any question you get during package installation, I'll provide a picture with the answer :)
That's it! You've just installed and configured your first Ubuntu Orchestra server, and you're now ready to install a fleet of Ubuntu servers the easy way! In part 2 of this article, I'll go through creating a second server, PXE booting and installing it from the orchestra server. (Extra credit: If you can't wait, try PXE booting a fresh server right now. Note that after installation, orchestra actually downloads and auto-imports a few Ubuntu mini ISOs, thus will need a few minutes depending on your internet connection speed)
So, what do you think of this coolness? Is this easier than the last time you tried building yourself an automated network installer? Shoot me a comment, let me know what you think


1 comment:
Why not modifying slightly the preseed file to autoselect the first interface:
d-i netcfg/choose_interface select eth0
Great tutorial, thanks!
Post a Comment